 The previous post about the LoRa board I bought via Aliexpress, I did in Dutch. I should have know that, like often happens with the more technical posts on my blog, the majority of people interested in it are not from the Netherlands.
So, this follow-up post about connecting a sensor to it, I’ll do in English again.
I will do the quick summary of the previous post first, so you’ll have an all-in-one topic:
This board was the first one I bought of Aliexpress. It was cheap, €13,9 incl. shipping for ESP32 + SX1276 + 0.96 inch OLED. ESP32 means WiFi (like you have with the ESP8266) *and* Bluetooth build in. If you compare that to a LoPy (about 50 euros) or a Marvin (about 85 euros), that is cheap. Problem though with Aliexpress is that you don’t always get a nice manual with the device.
Luckely there is a very active forum at The Things Network, and they have a topic specific for this combination of ESP32 and SX1276 chip. A number of people, much smarter than me, took the time there to figure out how to setup the board. All I had to do is go through their posts.
I’m documenting the steps to setup the board here, making it just a bit easier to get going:
Step 1 was making sure that the Arduino IDE becomes capable of compiling code for the board and to upload it to it. To do that you need to go to this repository. Scroll down to get to the English instructions. I didn’t use the option to checkout via git, but simple downloaded it as a Zip file (big green button upper right). In the folder ..\Documents\Arduino\hardware on my laptop I created a folder “heltec” and within that I copied the folders “esp32” and “esp8266” from the ZIP file.
Important: in the folder ..\Documents\Arduino\hardware\heltec\esp32\tools there is a file called get.exe. You need to double click that file so a number of other files can be downloaded.
Step 2 is to download the Arduino-LMIC library that handles the communication with the SX1276 chip on the board. Here again I downloaded the ZIP-file from github. Since this is a library, it needs to be installed from within the Arduino IDE via Sketchs > Include Library > Add .ZIP library.
Step 3 is making sure we can output stuff to the OLED. For that we need to install the U8x8lib library. I used th build in option to install the library via Sketch > Include Library > Manage Library. Just search for U8x8 and install it.
So now we can start: As board you select “WiFi_LoRa_32”. The LIMC repository on github, provided by Matthijs Kooijman als includes a number of examples for use of the code with The Things Network. You can choose for either OTAA or ABP. Of course you will need to create a new device in the TTN console first. That way you’ll get the needed codes to add in your copy of the code (making sure the data of your device gets delivered at the right location).
There is another change you have to make within the provided example code. You have to change this code snippet:
// Pin mapping
const lmic_pinmap lmic_pins = {
.nss = 6,
.rxtx = LMIC_UNUSED_PIN,
.rst = 5,
.dio = {2, 3, 4},
};
into:
// Pin mapping
const lmic_pinmap lmic_pins = {
.nss = 18,
.rxtx = LMIC_UNUSED_PIN,
.rst = 14,
.dio = {26, 33, 32},
};
Also, the examples provided with the LMIC library don’t use the OLED screen, so that won’t show anything if you run the code as is. That could be useful if you don’t plan on using the screen (but then you’d be better off with the even cheaper version of the board without OLED). The needed code is easy to add, see this post and this result using OTAA. I wanted to use ABP, so I extended the LMIC example for use of OLED and put the result here. All you need to do is add your own TTN codes (set your device to ABP on TTN also, it defaults to OTAA and remember to reset the counter to zero if you reset the device during testing!).
The example code itself doesn’t do much. It jus keeps sending “Hello, world!”. If you look for the data received by TTN in the console, you won’t see that text there at first. You should see a payload containing “48656C6C6F2C20776F726C6421”. If you don’t know why that is, first read this topic. It explains that these are the hexadecimal codes for the string we’re sending. “48” is the hexadecimal code for “H” (for the more senior readers, have a look at this ASCII table, find 48 in the second column, and look to the right for the corresponding character.
Translating the ASCII values back to a string can be done automatically by TTN if you tell it how to. You can create a payload function for that (you can find it as “Payload Formats” on Application level, not on Device level). If you add this function:
function Decoder(bytes, port) {
var text = String.fromCharCode.apply(null, bytes);
return {
message: text
}
}
Then the incoming payload gets translated into a JSON-object containing the string as “message”.
So this is where the Dutch post finished. I mentioned there that just sending the same string wasn’t that useful, so the next step would be to connect a sensor. To know where to connect that sensor, a schema of the pinouts is needed. Luckily, the merchant provides one as part of the listing of the product. It is incorrect however.
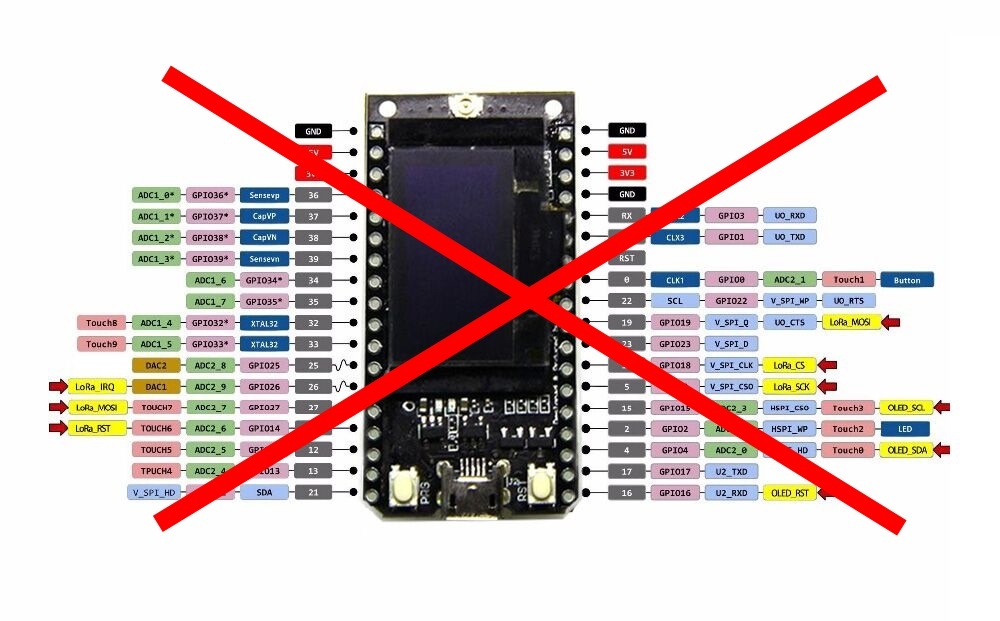
The order of the pins is correct, but they are the wrong way around. The GND and 5V/3V pins are near the buttons. But they are also mirrored, so pin 21 is on the right hand side if you have the buttons on top. It is not that different, just that the board is flipped the other way around. You can tell if you look at the numbers and codes on the backside of the board.
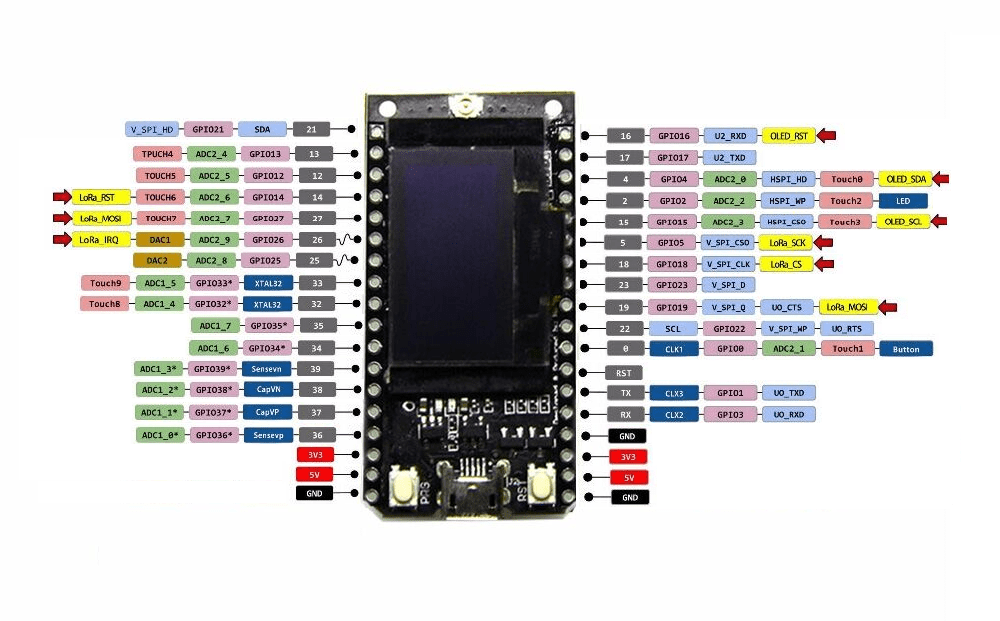
Besides needing to having the correct schema, some of the pins are already in use by the existing script. A quick look at the code lists GPIO-pins 15, 4, 16, 18, 14, 26, 33, 32 as already in use. I haven’t done the check yet to see if more ports are in use, the indications of “LoRa_” and “LED” and “OLED” in the pinout schema make that I expect more ports to be in use.
Whats next
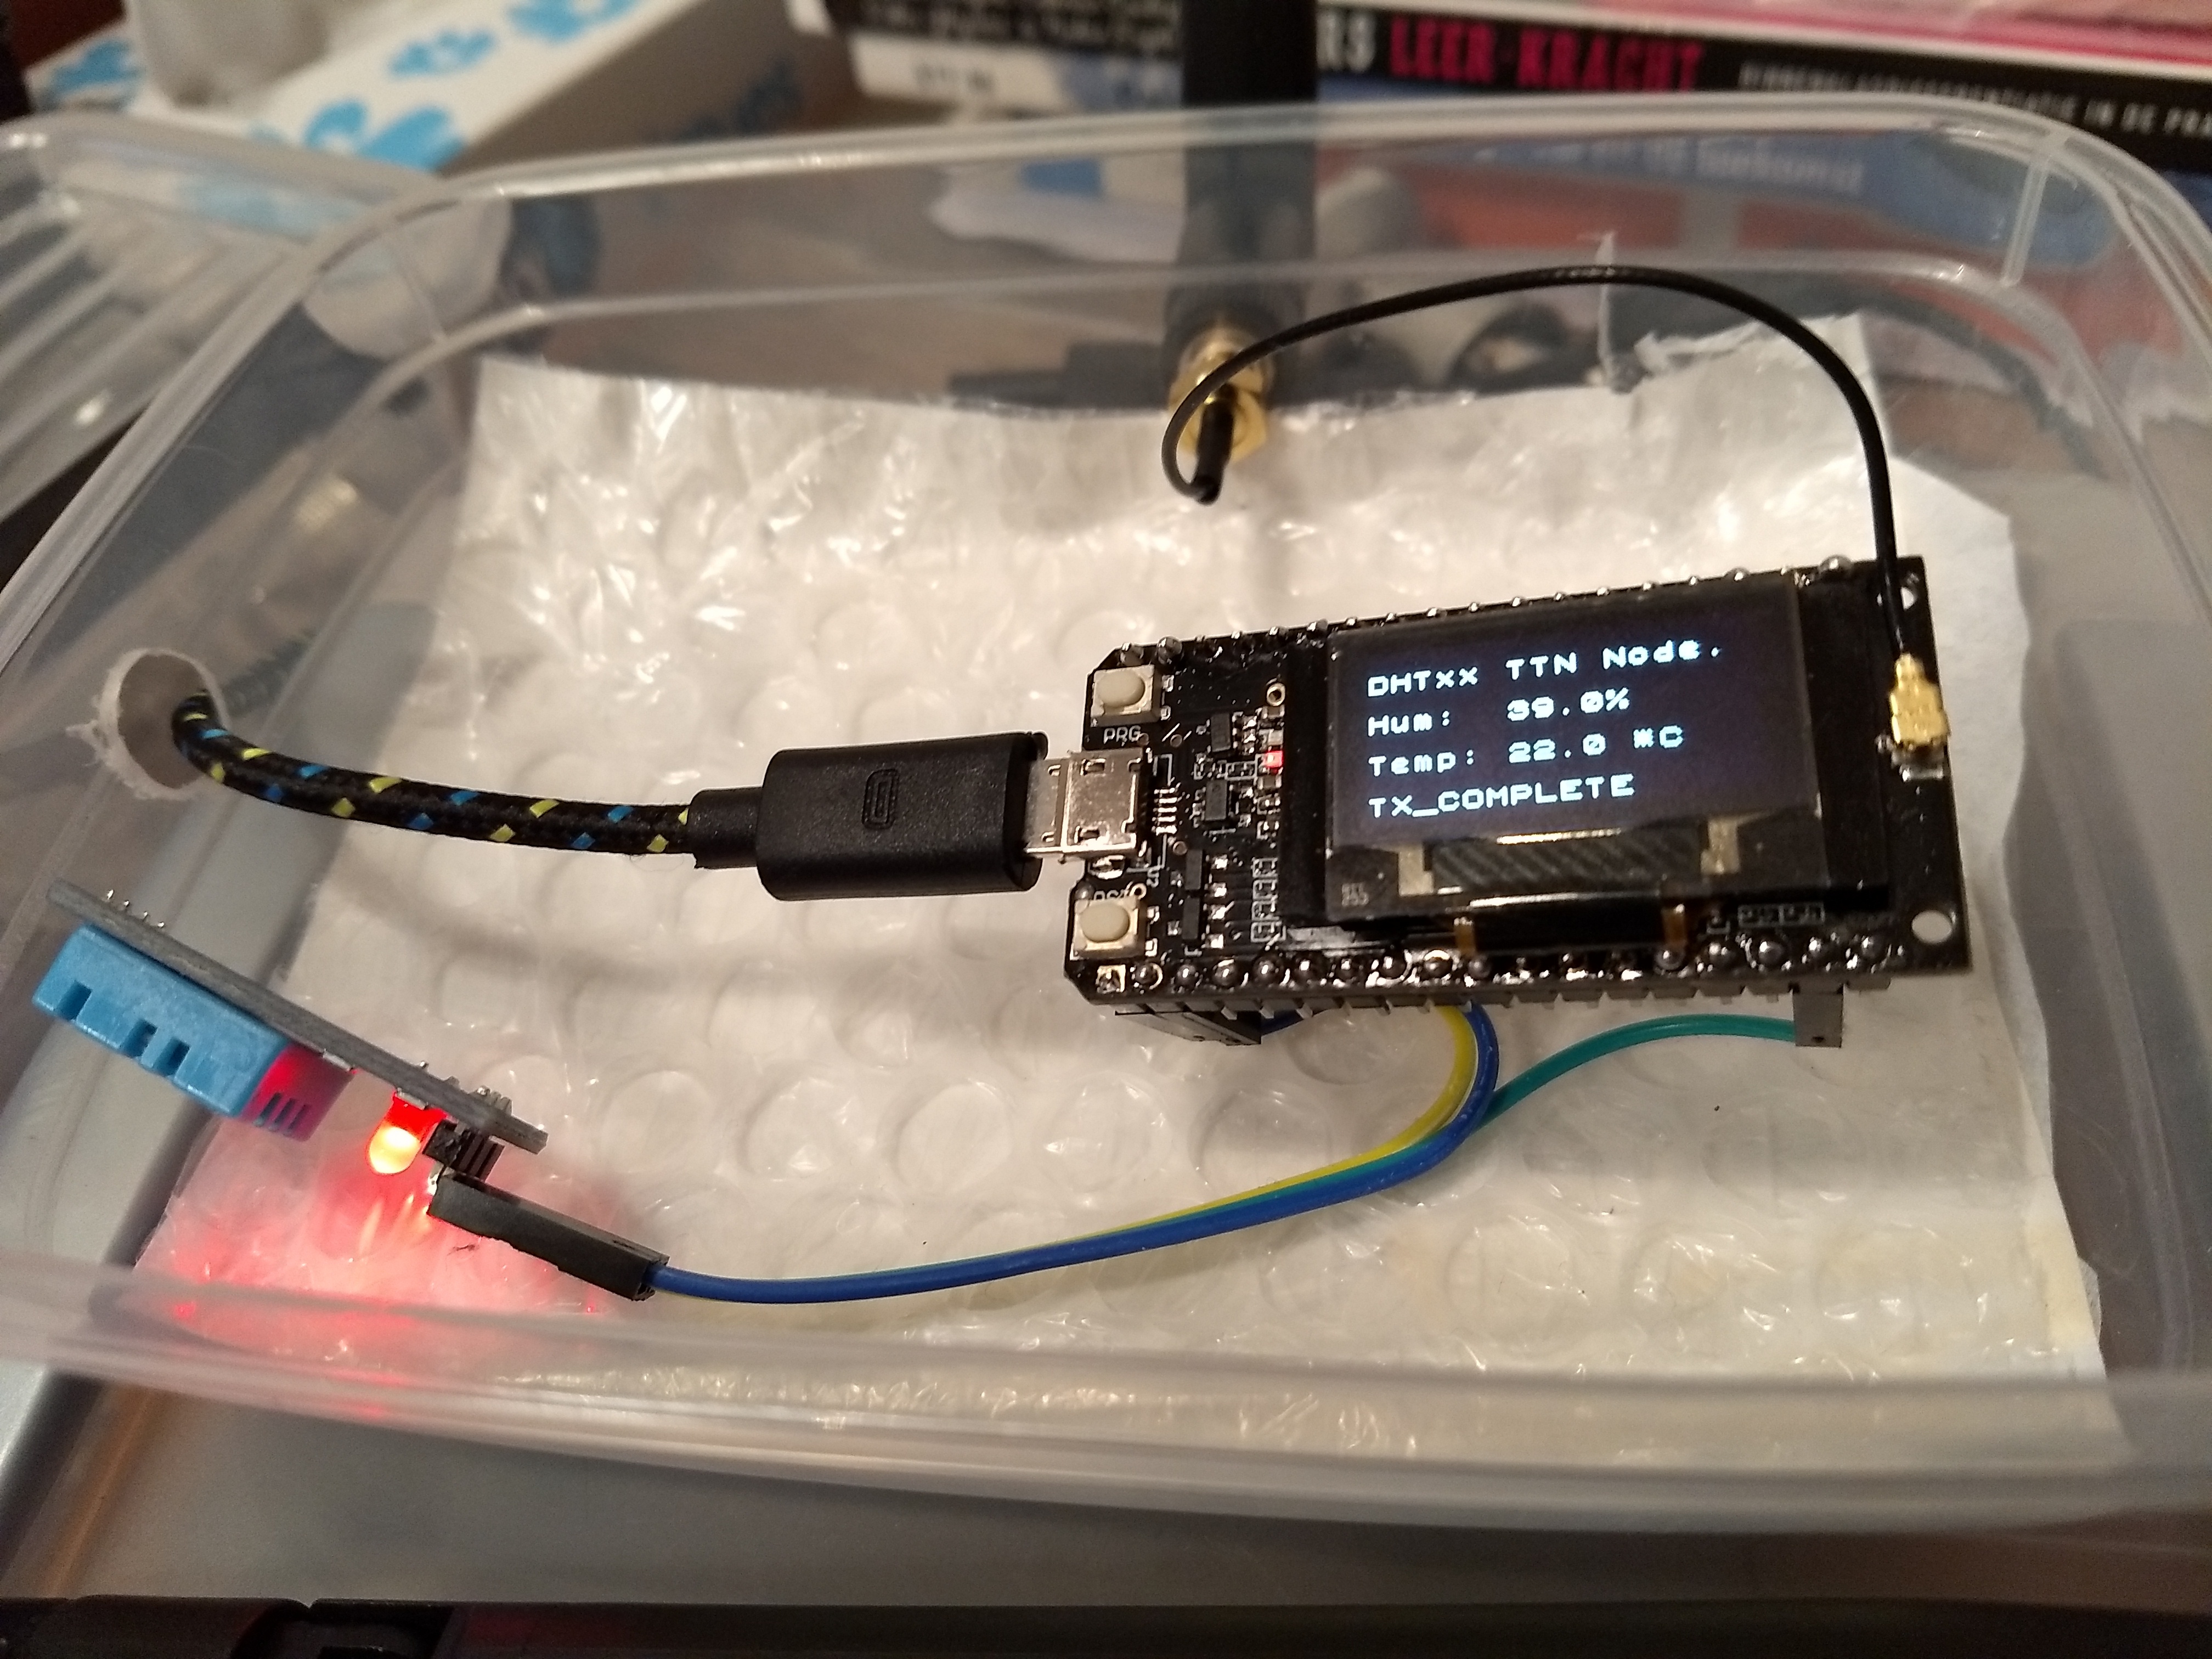
Next up is attaching a sensor. I’ll use the DHT11 temperature / moisture sensor since I expect that about anyone has one of those and it also provides a nice reason to show how to transport numbers via TTN.
I’ll link it here when it is online, so if you read this it isn’t just yet. 🙂


great. thx.
Hi, I can’t download the first repository is there any other alternative you could suggest?
You mean this one: https://github.com/Heltec-Aaron-Lee/WiFi_Kit_series ?
What is wrong with it then?