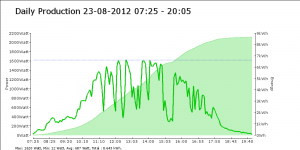
 What does it do?
Previously I have setup my Raspberry Pi so that it reads the output of my SMA 1600TL solar panel inverter every 5 minutes. It stores that data in a local MySQL database and posts it online to PVOutput.org.
You can read about that setup here.
Now, PVOutput.org creates really nice graphs, but I also want to have something like a daily report/graph without having to print/create one from the site by hand.
So, I created a script that creates a daily graph, using the data in the MySQL database (no need to get from PVOutput what we already got) and then mails that to me. I have setup a cronjob so it happens every evening at 9PM.
I have documented the steps below in case you also want to do something like this.
Note: the setup is for SMA-Bluetooth, so even if you have a different inverter than I have, it should work.
Connect via Putty and via WinSCP
In Putty:
# sudo bash

# apt-get update
First we need to install Apache and PHP with GD support
Create a group and user for Apache. The group might already exist, no problem, just ignore the error in that case.
# groupadd www-data

# usermod -a -G www-data www-data
# apt-get install apache2
Test the Apache server is running, by adding the IP address for your server in a browser, e.g. http://192.168.1.73/
If it works, we can continue with the setup in Putty:
# cd /home/pi/bin

# chmod 0777 /var/www

# ln -s /var/www www
We now have a writable www directory with a simlink making it a bit easier to find.
Now setup PHP. We probably don’t need all the libraries installed here, but I installed them anyway.
# apt-get install libapache2-mod-php5 libapache2-mod-perl2 php5 php5-cli php5-common php5-curl php5-dev php5-gd php5-imap php5-ldap php5-mysql php5-odbc
Let’s check to see it is installed correctly:
# cd /var/www

# touch index.php

# nano index.php
Edit index.php so it contains:
<?php

phpinfo();

?>
Test http://192.168.1.73/index.php to see that Apache + PHP are up and running
If all works as expected, we are ready for the rest of the setup:
# mkdir /var/www/smareport

# cd /var/www/smareport
Download the pChart library:
# wget http://www.pchart.net/release/pChart2.1.3.tar.gz
# tar xvzf *.gz

# mv pChart2.1.3 pChart

# rm pChart2.1.3.tar.gz
Test http://192.168.1.73/smareport/pChart to see that pChart is up and running
Now use WinSCP to upload [index.php] file to /var/www/smareport (remember to rename it to index.php!)
[update – sorry, forgot this step to create the images folder:]
# exit

$ mkdir images

$ sudo bash
Now we are going to install sendmail and mutt so we can send the mails
# apt-get install sendmail-bin

# apt-get install mutt
We need to setup mutt. This is done using a file called .muttrc
You can download an example from here
# cd /home/pi

# wget http://cache.gawker.com/assets/images/lifehacker/2010/06/muttrc-gmail.txt

# mv muttrc-gmail.txt .muttrc

# nano .muttrc
Edit the first six lines of the file to match your gmail account info.
Next we will create a daily cronjob to mail you the report
Upload the [mail_report] file to /var/www/smareport
Make sure you edit the mailreceiver and rename the file to remove the .txt!
Upload the [message.txt] file to /var/www/smareport (this one you don’t need to rename!)
# chmod 0754 mail_report

# crontab -e
Add this:
0 21 * * * /var/www/smareport/mail_report >/dev/null 2>&1
Ctrl+X

Yes

Enter
Done!
Note: you can run ‘old’ reports from the commandline via /var/www/smareport 20120822
You can also run it straight from the browser, but remember that it takes some time to generate the graph!
[26-8-2012] There now is a version 2 of the script available that also show temperature data in the graph. Don’t worry, the version 1 is a requirement, so you are almost done. Just proceed to the setup for version 2.
